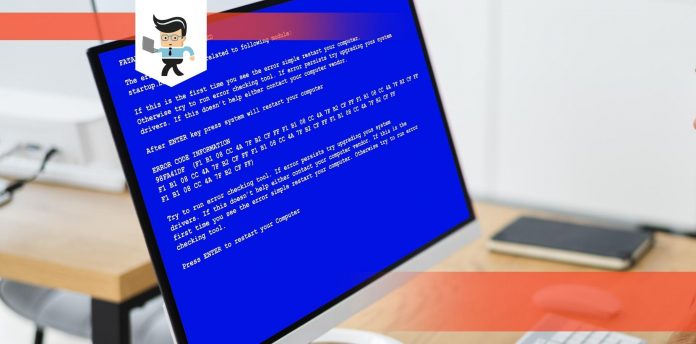
Computer stuck restarting is a problem that can be caused by many different reasons, including an improper shutdown and outdated drivers, among other factors. Once you’re able to identify the cause, you can apply the perfect solution, ensuring that the restart loop is fixed effectively.
In this article, our computer experts will be sharing information on why Windows is stuck on restarting and the ideal ways to resolve the problem.
Let’s dive right into it, shall we?
Contents
Why Is My Computer Taking So Long To Restart?
Your computer can be stuck on restarting because of an improper shutdown, outdated drivers, pending Windows update, or a faulty RAM or hard drive, among others. Here are some more in-depth reasons for this issue.
– An Improper Shutdown
If your PC didn’t shut down correctly, it may get stuck on the restart screen when it tries to boot back up. An improper shutdown can be a result of a simple problem like hibernating your PC for too long or an outdated driver to a more serious issue like memory, hard disk, or Windows OS problem.
– Outdated Drivers
If one or more important drivers are outdated, they may not work properly, especially if your Windows OS is up to date and your driver remains outdated. This difference can cause conflicts between your OS and drivers, thereby causing computer stuck on restarting screen. Simply updating or uninstalling and reinstalling your drivers can fix this issue.
– Pending Windows Update
If you have a pending OS update, your computer may take forever to restart. It’s recommended that you complete your OS updates before trying to restart your computer. Also, if you perform a major OS update, such as migrating from Windows 10 to Windows 11, it’s normal for your PC to take a while to restart in this case.
– Bad RAM or Hard Drive
A bad hardware can cause your computer taking forever to restart. If your RAM, hard drive, or SSD is faulty, your computer may be stuck on the restart screen or restart continuously even when you’re working or gaming on your PC.
– Fast Startup is Enabled
While it’s true that the Fast Startup feature helps your computer boot faster, it can also cause problems like PC stuck on restarting, especially if you use Wake-on-LAN. Some users have even found their power button to be inactive as a result of enabling fast startup.
How To Fix Computer Stuck on Restarting Screen
There are many different ways to fix your computer that is stuck on the restart screen, including:
– Unplugging All Connected Devices
If some external devices are connected to your computer during the restart, they may be the reason why your computer is taking forever to restart. Some external devices can cause conflicts with the internal peripherals of your computer, thereby causing a problem during normal boot.
What you’ll need to do is unplug all unnecessary devices as long as they have nothing to do with your computer’s booting process. These external peripherals can include your mouse, external HDD or SSD, flash drives, cameras, mobile device, SD card, etc. Once all irrelevant external devices have been disconnected, restart your PC and see if this fixes the problem.
If this solution fixes the problem, you’ll have to manually go into your device manager and update the driver for each external device connected to your computer once your computer boots back up.
Follow the steps below to update your external device drivers:
- First, connect your external peripherals once your computer boots back up.
- Now, place your cursor on the start menu and click on your mouse’s right button.
- Choose the “Device Manager” option from the list of options provided.
- Navigate through the list of drivers on the right panel and select the device whose driver you want to update, depending on the device plugged into your PC.
- Right-click on the driver and pick “Update driver” from the list of options.
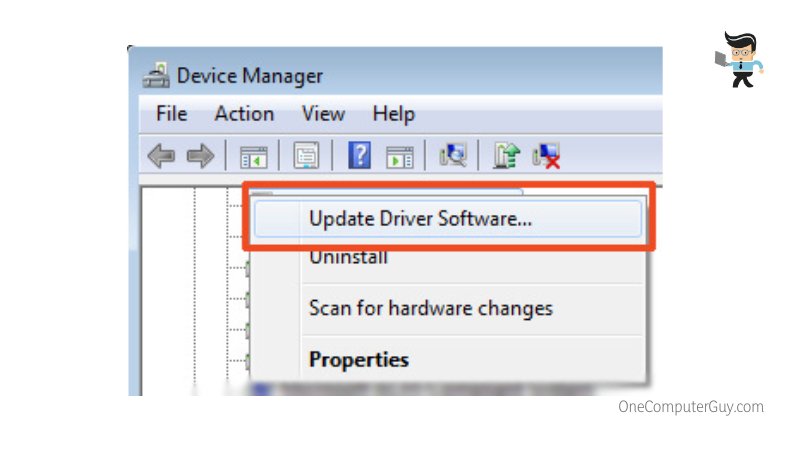
- Select “Update driver automatically” on the next window and follow the on-screen guide to update the driver.
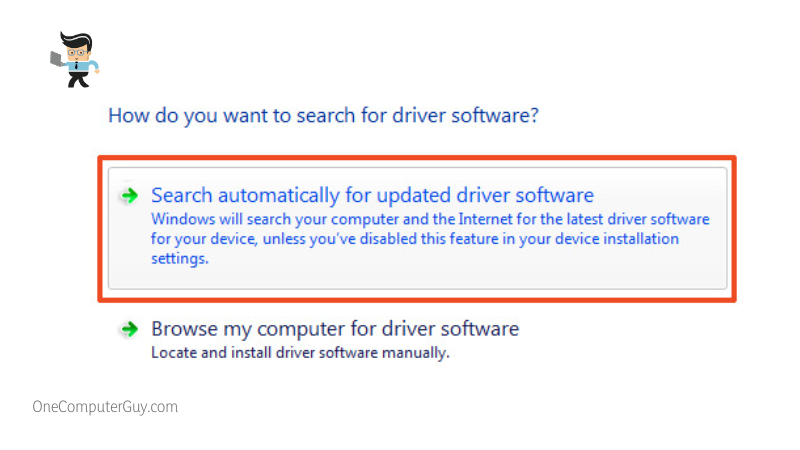
- Your computer will automatically scan the manufacturer’s website, download, and install the driver.
- When the installation is complete, immediately restart your computer and check whether or not the problem has been permanently fixed.
- If not, move to the next solution below.
– Perform a Forced Shutdown
As we mentioned earlier, there are many different reasons why you may experience your PC or laptop stuck on restarting. However, this solution is one that works in most scenarios, especially if the problem was caused by continuous hibernation. Shutting down your computer will force close all processes, thereby allowing your PC to start afresh instead of loading up all hibernated processes.
To perform a forced shutdown, all you have to do is hold down your PC or laptop’s power button for about six to ten seconds. Doing so should turn your computer off. Once your PC is off, wait for about five seconds then turn it on like you normally would.
This process should help you resolve the problem. If it doesn’t, the next solution might.
– Disable Fast Startup
Fast startup is a feature from Windows that helps the OS boot or restart faster. However, something can go wrong with this feature and cause it to negatively affect the restart or shutdown process.
To fix this issue, you’ll need to follow the steps outlined below:
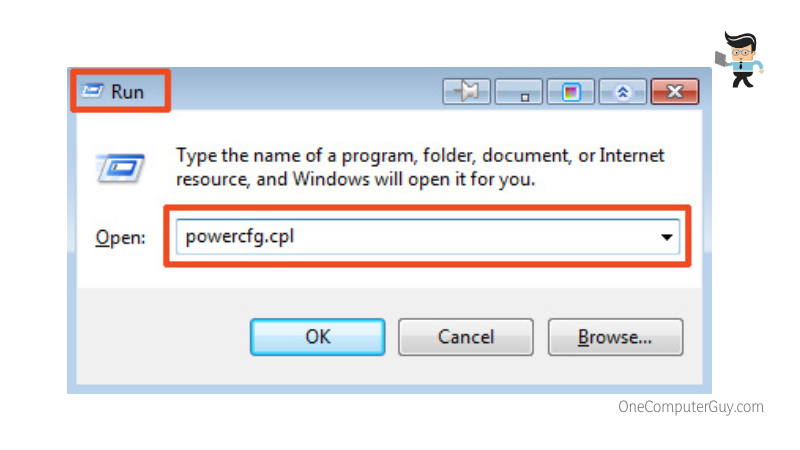
- Press the R button and Windows key on your keyboard to open the “Run” dialog box.
- Copy and paste the command “powercfg.cpl” into the Run dialog box and click on “OK.”
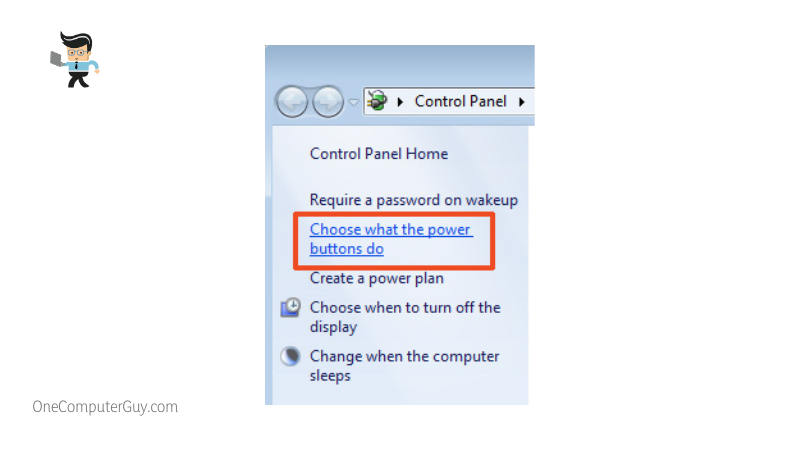
- In the next window, select the “Choose what the power button does” option.
- Now, select the “Change settings that are currently unavailable” option.
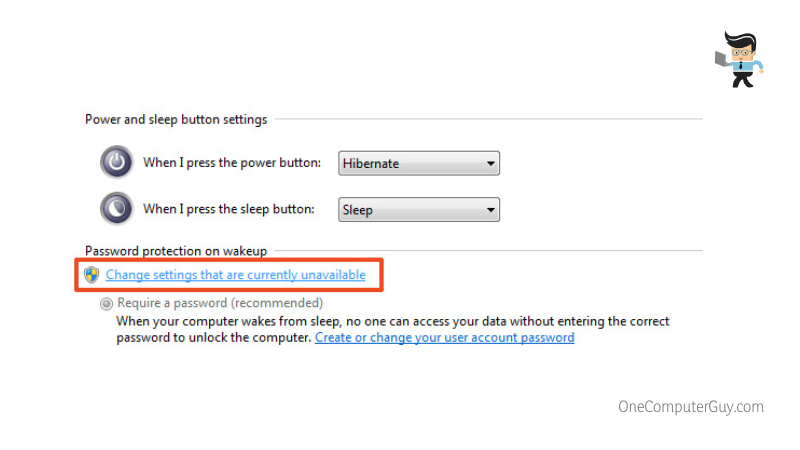
- Next, check to see if the box beside the “Turn on fast startup (Recommended)” option is checked.
- If it is, uncheck the box and select “Save changes” below.
- Once you’ve saved your changes, close all windows and restart your computer so the changes can take effect and you can check to see whether the solution works or not.
– Close All Unresponsive Processes
Closing all unresponsive can help your computer restart easily.
All you have to do is:
- Right-click on your start menu and select “Task Manager” from the list of options.
- Alternatively, you can press the ctrl, alt, and ESC keys simultaneously to open the Task Manager window.
- Now, search for every process that isn’t vital to your computer’s startup operation.
- Right-click on each of these processes and select “End Task.”
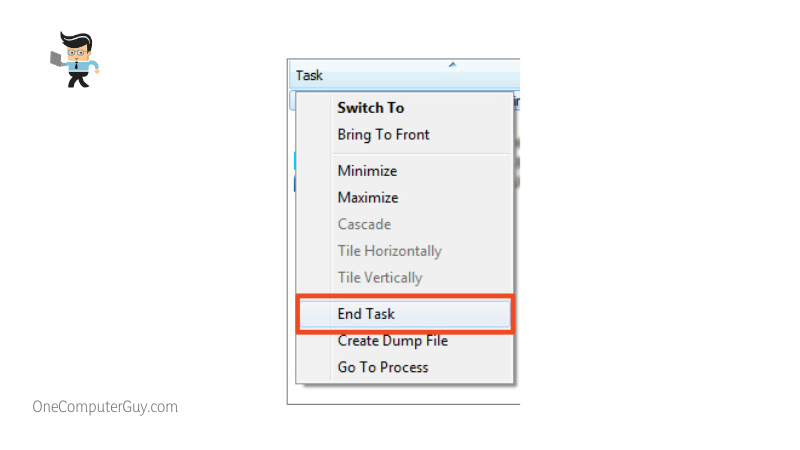
- Once you’ve ended all irrelevant processes, close the task manager and restart your PC.
– Restart the Windows Update Process
Sometimes, Windows can encounter an error during its update process, which can stop it from installing the new update. If the system can’t apply the new update, your computer is likely to experience problems like getting stuck on the restart screen.
To resolve this hitch, all you have to do is:
- Open the “Run” dialog box by pressing and holding both the R button and Windows key simultaneously.
- Type the command “cmd” into the dialog box and press the shift, ctrl, and enter keys at the same time to run the command prompt with administrator access.
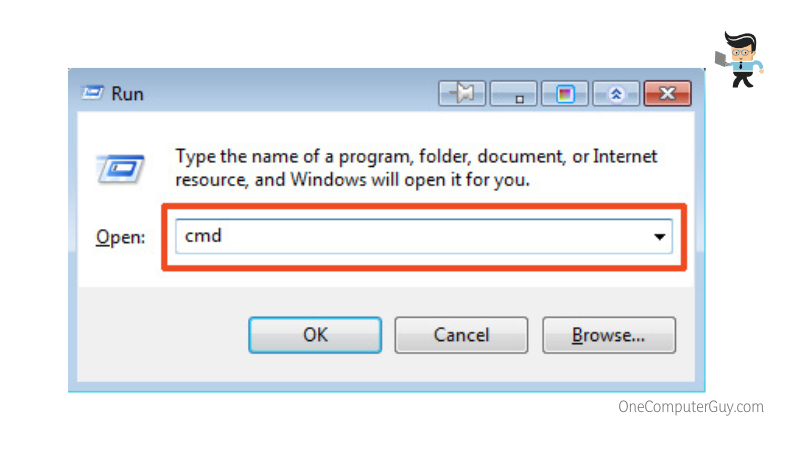
- Once the command prompt is open, type in the command “net stop wuauserv” and press the enter key.
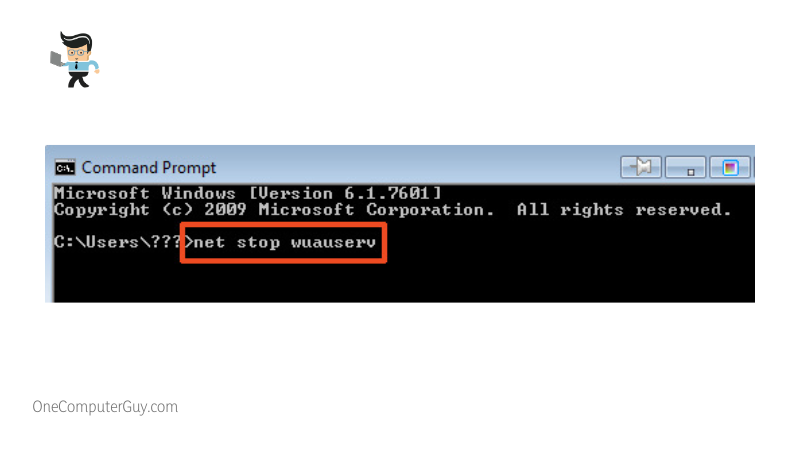
- The next thing you’ll need to do is to type in the following command “cd %systemroot%” and hit the enter key.
- Once that is done, type the command “ren SoftwareDistribution SD.old” and press the enter key.
- Next, type in “net start wuauserv” and press enter.
- The commands above will stop and restart the update process, thereby removing any error that Windows may have encountered while trying to apply the update.
- Restart your computer and when it boots back up, check to see if the issue has been resolved.
– Utilize the Windows 10 Troubleshooter
The Windows troubleshooter is a built-in tool that helps in resolving issues related to the OS. It’ll help you diagnose and apply the fix to the problem. If it can’t resolve the issue, the Windows troubleshooter will provide you with recommendations on what to do.
Here’s how to run the troubleshooter:
- Click on the search bar or icon right next to your start menu, type in “Control Panel,” and select the top result from the search results provided.
- In the control panel window, select the “View by” option at the top-right corner of the screen and choose “Large icons” from the drop-down menu.
- Now, navigate through the list of control panel options and select “Troubleshooting.”
- Click on the “View All” option on the left panel then select “System Maintenance.”
- Choose to “Apply repairs automatically” and follow the on-screen instructions to complete the process.
- The troubleshooter will scan your computer for issues and provide you with fixes and a prompt to apply the most ideal fix.
- Once the troubleshooting process is done, close the troubleshooter and control panel, and restart your computer.
– Update Your Device Drivers
We noted above that outdated drivers can cause your PC to produce a myriad of problems, including getting stuck on the restart screen. The easiest fix to this issue is to update your device drivers. You can update your device drivers automatically via the Windows Update or manually through the device manager.
– Updating Your Drivers Through Windows Update
Follow the steps below to update your drivers via Windows update:
- Hit the Windows logo button on your keyboard to launch your start menu.
- Now, choose the gear icon located at the bottom left panel of your start menu to go into your settings menu.
- In the settings menu, select “Windows Update.”
- In the next window, you’ll be provided with the “Check for updates” button, which is usually on the far right corner.
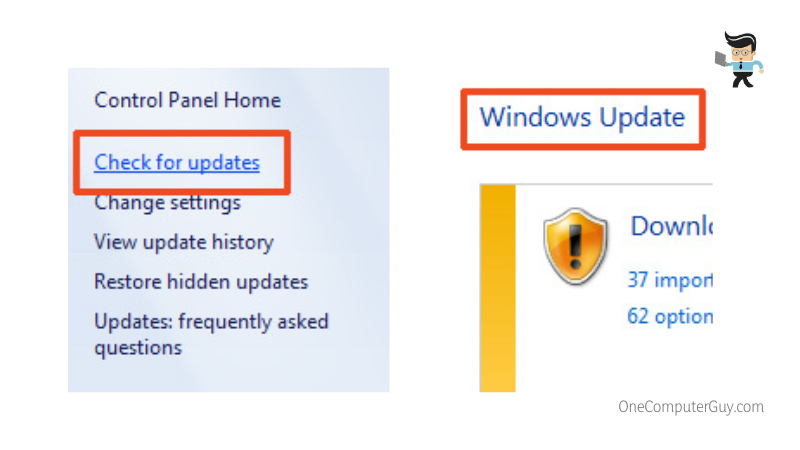
- Click on the button so your computer can search for updates.
- If there are updates available, your computer will start downloading them automatically.
- If there aren’t any updates available, scroll down to the bottom of the screen and select “Advanced options.”
- Scroll to the “Additional options” tab and choose “Optional updates.
- If there are any driver updates available, select the update option and your computer will download and install them.
- As soon as installation is complete, restart your PC and check to see if the problem has been fixed.
– Updating Your Drivers Through the Device Manager
Sometimes, a manufacturer may be late to submit their updates to Microsoft or unforeseen circumstances can cause the driver update to not be packaged with the Windows update.
At times like these, your drivers won’t automatically be updated if you use Windows update. Manually updating your drivers via the device manager will come in handy.
Here’s how to go about it:
- Place your cursor on your start menu and press your mouse’s right button.
- Choose “Device Manager” from the options that come up.
- On the next window, right-click on the driver you want to update and select “Update driver” from the list of options.
- You’ll be prompted whether to update automatically or manually.
- Select the automatic process and your computer will scan the internet for the updated version of the driver.
- If there’s an update, your PC will automatically download and install the update.
- After installation, close the device manager window and restart your PC.
– Manual Driver Installation
To update your driver manually, you’ll first need to go to the manufacturer’s website and download the updated version of the driver. Once you’ve downloaded the driver and saved it on your computer, follow the steps below:
- Open your Device Manager as outlined above.
- Right-click on the outdated driver and select “Update driver” from the list of options.
- Now, choose the manual installation option.
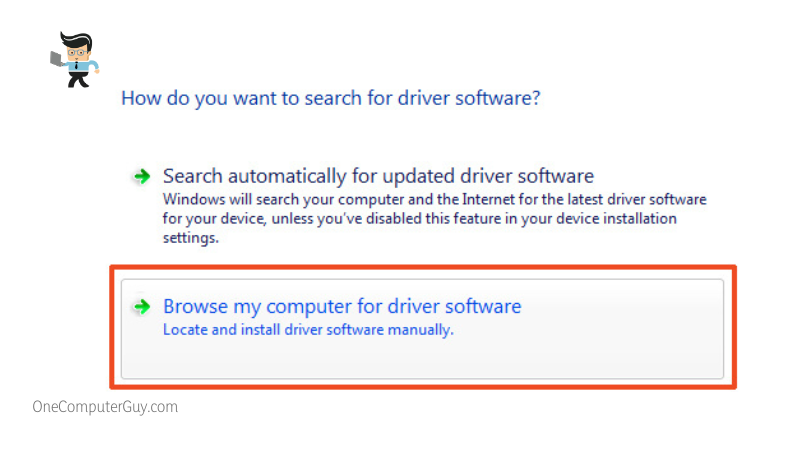
- Navigate to the folder where you saved the updated driver version you downloaded.
- Select the file and click on “Ok.”
- Once the file has been installed and the driver updated, restart your PC and check to see if the problem has been resolved.
– Update Your Computer’s BIOS
An outdated or faulty BIOS can cause many different problems to your computer. The Basic Input Output System, otherwise known as the BIOS, is a hardware initialization system that helps jumpstart your computer’s processes during boot-up.
It’s a sensitive system so you’ll need to proceed with caution when performing even the littlest action on your BIOS as a small mistake can cause you to lose data or even totally damage your PC. Therefore, if you are unsure about how to proceed with this step or you’re not tech-savvy, make sure you seek professional help to avoid any problems.
Below is a step-by-step guide on how to update your computer’s BIOS:
- Press and hold the R button and Windows key on your keyboard at the same time to launch the “Run” dialog box.
- Copy and paste the command “msinfo32” into the Run dialog box and press the enter key.
- The next window will provide you with various information about your computer.
- Navigate to the “BIOS version/date” information and note down the version number and manufacturer’s name.
- Close the information window, open your browser, and go to the manufacturer’s website.
- Check the support or download section of the website and search for the latest BIOS update.
- If the file is the same as the version number you wrote down, then your BIOS is up to date.
- If the version number you wrote down doesn’t correspond with what’s on the website, then your BIOS is outdated.
- Download the updated version from the manufacturer’s website and install it.
- After the installation is complete, restart your PC to see if it boots up properly.
Conclusion
We believe that you should be able to fix why your computer is stuck on the restart screen with the solutions above. Here is a quick summary to make sure you have the right tools you need to resolve the problem:
- Outdated drivers, continuous hibernation, and errors during Windows Update are some of the reasons why your computer may take forever to restart.
- Performing a forced shutdown kills all processes so you may lose unsaved work.
- Your computer’s BIOS is a very sensitive system so make sure you’re extra careful when working on it.
- The Windows troubleshooter diagnoses and applies fixes to different problems so make sure to try it.
- The drivers of your external peripherals can cause conflicts with the original drivers, thereby causing your restart to take too long.
If you try the solutions above and there’s no change, then the issue might be hardware-related. You might have a bad RAM or storage device, in which case we recommend that you find a competent professional and let them assist you in fixing the problem, especially if you’re not tech-savvy.

